Detecting Face Mask Usage Using Inception Network
Based on the research paper Face Mask Usage Detection Using Inception Network. Full repository of the code including the trained model is at Improper Mask Detector. To use the trained model directly, then skip to the testing part of this article after completing the installation part.
Installation Guide
Make sure you have Python 3.6 or newer. For Windows, when installing Python, pip will automatically get installed. However, for OSX, it already comes with Python but the pip is not yet installed. To install it, just execute in the Terminal curl https://bootstrap.pypa.io/get-pip.py -o get-pip.py (for Python 3.6). After installing pip, we can now install the required libraries. First, install Tensorflow by running the command pip install --upgrade tensorflow. Then after that, download this requirements.txt and run this command pip install -r requirements.txt.
Introduction
With the ongoing pandemic, one of the tools that has been proven effective in preventing the spread of the virus is wearing a face mask. However, there are some people who are not wearing it properly, thus lowering its effectiveness. In this article, we are going to train an Inception Network to determine whether a face is wearing a face mask properly. This article will be divided into three parts each with separate codes. The first part will be gathering of faces that have no face masks, with face masks properly worn, and faces with face masks incorrectly worn.
Gathering of Face Images
To gather face images using python, we will be importing the cv2 library and pafy. The cv2 library is used to detect faces in an image or frame of a video. The pafy library will be used to get frames of a video from YouTube. YouTube has many video clips with faces on it that are wearing face masks.
import cv2, pafy
In the code, either the user will pass a YouTube URL or a video file location to gather face data. If the parameter passed is the string “webcam”, then the video stream to gather data will be the web camera.
if (url=="webcam"):
	frames_to_skip = 1
	cap = cv2.VideoCapture(0)
else:
	if "youtube" in url:
		video_pafy = pafy.new(url)
		video_from_url = video_pafy.getbest().url
		cap = cv2.VideoCapture(video_from_url)
	else:
		cap = cv2.VideoCapture(url)
Gather the frames of the video stream in an infinite loop. Only exit from the loop if there is no more frame to get.
#get the frames of the video
while (True):
	ret, frame = cap.read()
	if (not ret):
		exit()
Before detecting faces, it is recommended to convert each frame of the video into grayscale. In this manner, the processing power will be less because instead of processing RGB values, the computer will only process one channel. To detect a face in an image or frame, the cv2 function CascadeClassifier is used. Each detected face in a frame will be saved in one file using the cv2 imwrite method. There can be multiple files that will be saved at a single frame if there are multiple faces detected.
#convert the image to gray for analysis
gray = cv2.cvtColor(frame, cv2.COLOR_BGR2GRAY)
#detect the faces
faceCascade = cv2.CascadeClassifier(cv2.data.haarcascades + "haarcascade_frontalface_default.xml")
faces = faceCascade.detectMultiScale(
	gray,
	scaleFactor=1.1,
	minNeighbors=2,
	minSize=(min_pixel_face, min_pixel_face)
)
#save rectangles in faces
for (x, y, w, h) in faces:
	#save each face to the untagged folder
	crop_img = frame[y: y + h, x: x + w]
	crop_img = cv2.resize(crop_img, (saved_image_size, saved_image_size))
	crop_img = cv2.cvtColor(crop_img, cv2.COLOR_BGR2GRAY)
	temp_filename = "untagged/" + randomString() + ".jpg"
	cv2.imwrite(temp_filename, crop_img)
	print("Face saved at " + temp_filename)
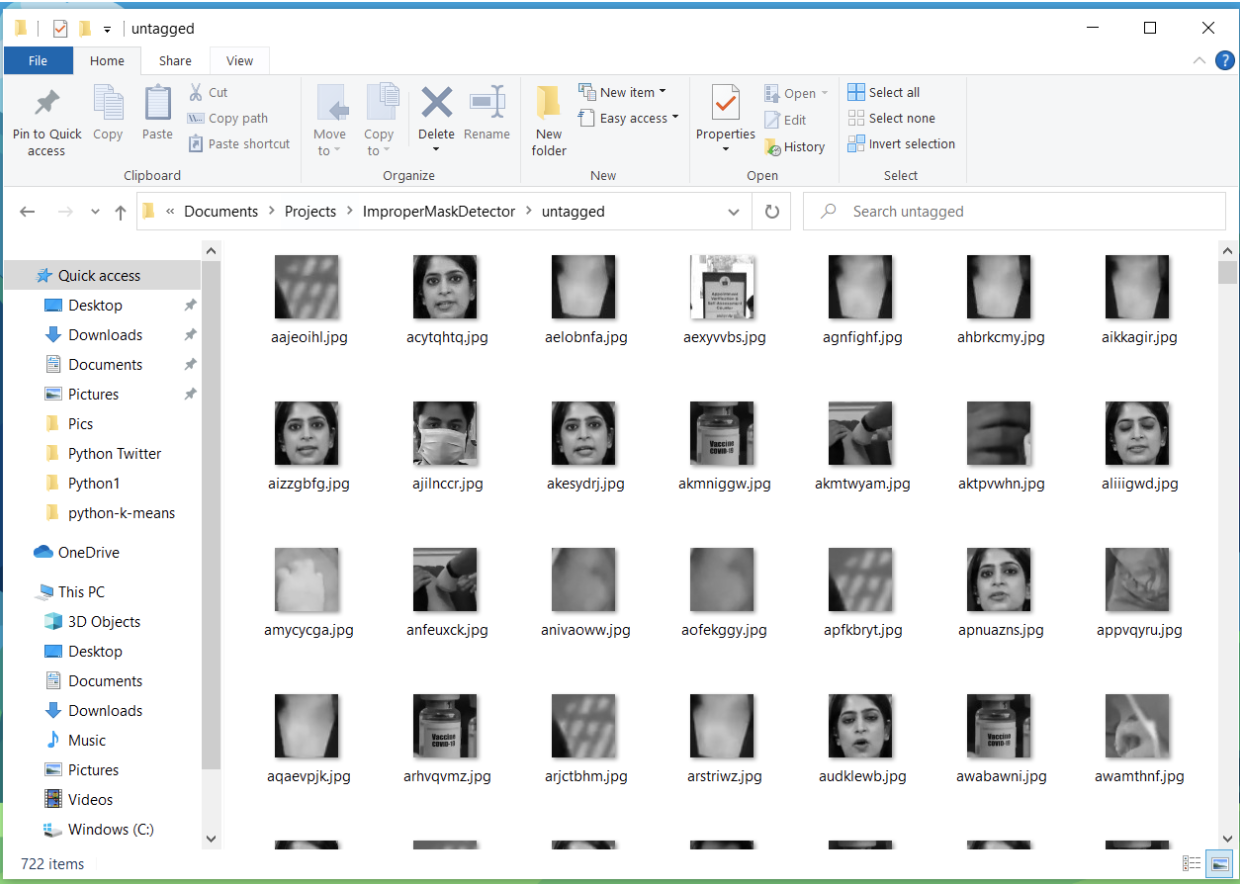
To run this data gatherer python script full code in here, either run this command python datagatherer.py https://www.youtube.com/watch?v=JIWXDcrJzi4 to gather faces from a YouTube video or python datagatherer.py webcam to gather faces from the web camera. After running this script, a folder untagged will contain images that have faces of people in it. If you do not see an untagged folder after running this script, then manually create a folder named untagged.
Now the hard and time consuming part is to classify these face images into four categories manually. The first category will be image faces with a face mask properly worn (fully_covered). Face mask properly worn by definition is where the mouth and nose are fully covered. The next category will be face images without a face mask, just regular faces (not_covered). The third category will be face images that incorrectly wear a face mask (partially_covered). These would be faces that have a face mask covering the mouth but not the nose. And the fourth category would be images that were saved but are not faces (not_face). This is due to a limitation of the cv2 function CascadeClassifier that falsely identifies a frame section as a valid face. Each of the category images must be stored in their own folders. The name of each folder will be used in the next part as the classification name.
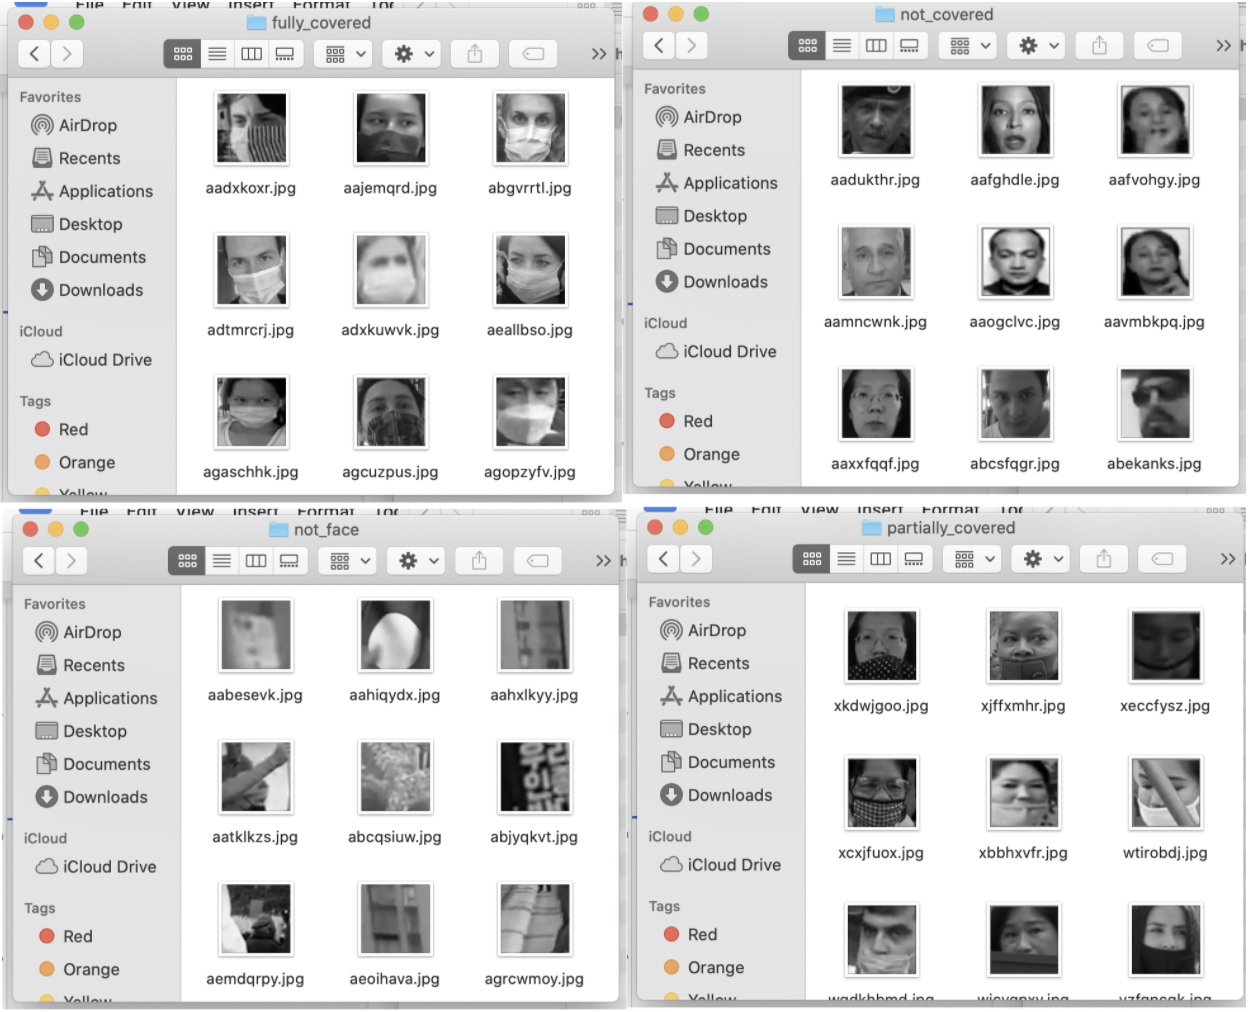
There is no exact sample size for each of the four categories that will be needed but in the research mentioned above, there were a total of 4,789 face images and almost a thousand non-facial images.
Creating the Model
Creating and training an Inception Model using the face images gathered. To be able to train an inception model, we first need to create an Inception model. This model will not only be used for training but it will also be used to test or detect a face where it is closest to the four classes defined above. The full code of the model.py is in this link https://raw.githubusercontent.com/jamesnogra/ImproperMaskDetector/master/model.py and the hyperparameters of the model in this link https://raw.githubusercontent.com/jamesnogra/ImproperMaskDetector/master/settings.py. The contents of the model.py can be roughly explained using the next diagram.
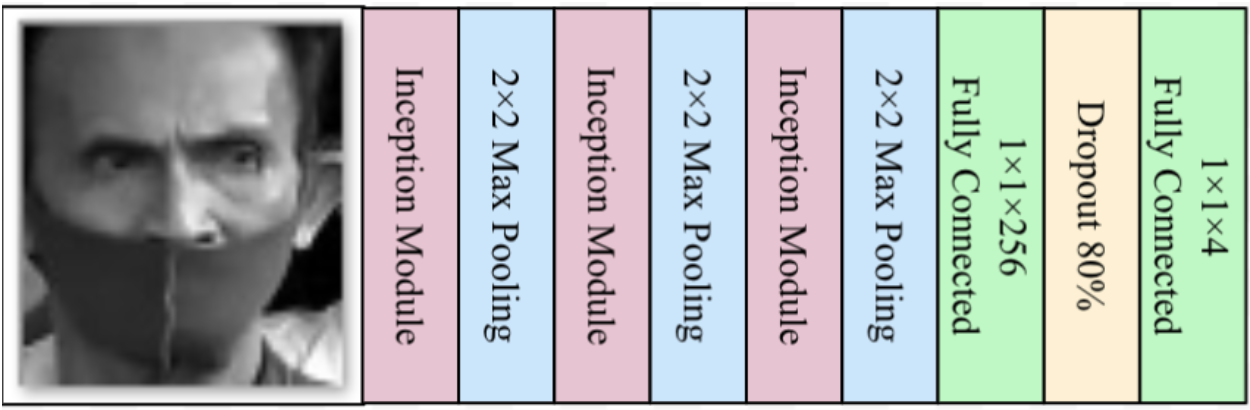
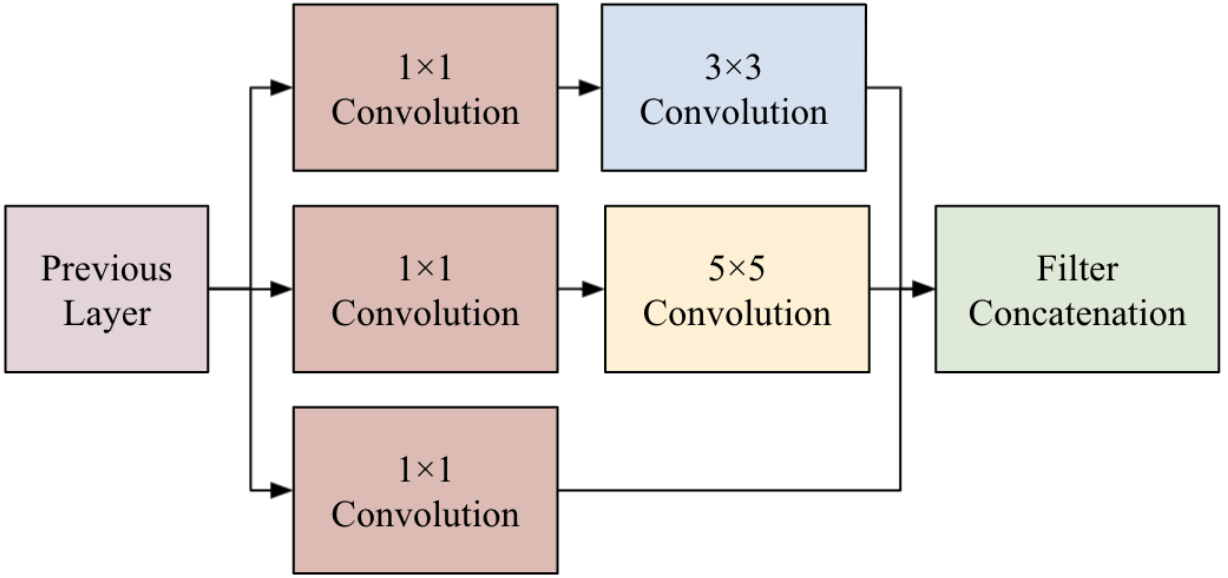
The process starts from left to right where right is the output (in model.py, this would be from top to bottom of the code). The 1x1x4 at the rightmost part of the diagram is the output which means there are four possible classes or outputs to be expected. In the code, the variable tower_1_x is the first Inception Module (pink rectangle) in the diagram above. An Inception module is just a series of parallel Convolutional Neural Networks with different sizes.
All convolution operations are using Tensorflow’s conv_2d method. The blue rectangles are max pooling operations and it’s using Tensorflow’s max_pool_2d method. In the entire model, there are three max pooling operations (variables named inception_x) and three inception modules (tower_x_x). The dropout operation (yellow rectangle) is added in the model so that it will avoid memorizing the images pixel by pixel.
Training the Model
To train the model, the code train.py is provided https://raw.githubusercontent.com/jamesnogra/ImproperMaskDetector/master/train.py. The model.py and settings.py files will be used in this code. It is important that the model used for training is the same as the model used for testing. This is the reason why we have a separate model.py file so that the training python file and testing python file will share the same model.py file. For training, this is already assumed that there is a folder named tagged and contains four folders of the classes of face mask usage including the non-facial images. The important things in this code are the loss = fully_connected(output, settings.NUM_OUTPUT, activation='softmax') which calls the fully_connected method of Tensorflow to obtain the output. The activation softmax means the output will be from 0 to 1 for each of the classes and all classes output values should add to 1. The next line network = tflearn.regression(loss, optimizer='RMSprop', loss='categorical_crossentropy', learning_rate=settings.LR, name='targets') is the network configuration using the Tensorflow’s regression method. While the model = tflearn.DNN(network, checkpoint_path=settings.MODEL_NAME, max_checkpoints=1, tensorboard_verbose=2, tensorboard_dir="./tflearn_logs/") will contain the entire model. The Tensorflow method DNN (Deep Neural Network) is the type of network that will be used. You can skip this process if you want to use the trained network used in this research which has 98% accuracy in classifying the face mask usage of faces. If you execute this training process, the trained network will be replaced. The trained network are saved files with names inception-0.0001-3inceptionlayers.modelxxx (There are three files).
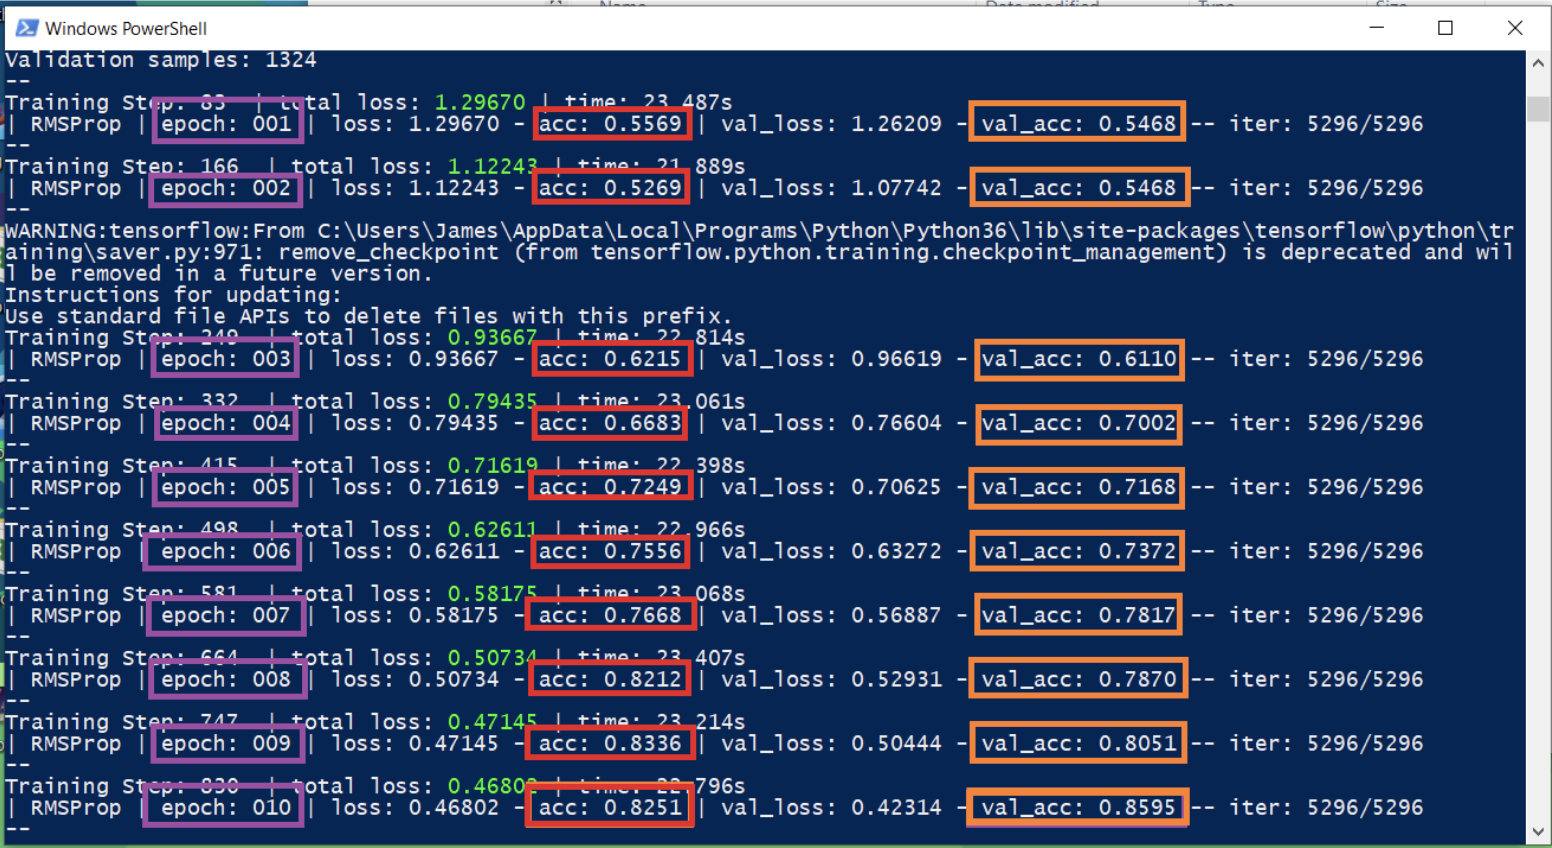
When running this code in the Terminal, there will be logging output but the important thing to note is that accuracy and validation accuracy should be increasing as the epochs progress. There are two types of accuracies because in machine learning, it is standard practice to segregate data for training the model while the rest is for validating the accuracy of the model. The images used for training the Inception Network are different from the images used for validating the network. This means that the training process only sees a portion of the images, not all. Usually, the validation accuracy (orange rectangle) value is lower than the training accuracy (red rectangle) because we are asking the model to classify images that it has not seen during training. The values with violet rectangles is the epoch. One epoch means the training has finished looking at all the images considered as training images. Training a network model is like training a child, they need to see images multiple times again and again even though they have seen it before. Every epoch, a trained model is saved in three files. If you haven’t changed the settings.py, the number of epochs defined is 50. These files will then be used for testing the model.
Testing the Model
To test the model, we will be needing two python files, one for loading the model once while the other one will be for a file that uses the mode. First is we define the serve.py https://raw.githubusercontent.com/jamesnogra/ImproperMaskDetector/master/serve.py which will load the model once. The serve.py file will of course import the model.py files and settings.py file which contains the model structure and configuration. Inside the serve.py is also a method called get_model_api which will be called by our main testing python file. Inside the get_model_api method is also another method called classify_face which accepts one parameter which is an image. This image parameter should be the detected face from a frame of a video.
For the 2nd file in testing the model, we would have test.py which would contain lines of codes similar to the python script to gather the data https://raw.githubusercontent.com/jamesnogra/ImproperMaskDetector/master/datagather.py. But instead of saving the detected faces into an image file, we will pass the detected faces to the get_model_api method defined in the serve.py.
from serve import get_model_api
…
face_class, probability = model_api(crop_img)
The get_model_api method will return two things. First is the class of the face which will be one of the four defined above. The next is just a probability value from 0 to 1 to determine how accurate the prediction is for that particular face image.
To run the code, simply execute the command python test.py YOUTUBE_URL for detecting faces and face mask usage in a YouTube video. You can also pass a video file URL instead of a YouTube URL. To detect face mask usage using a webcam, execute the command python test.py webcam.
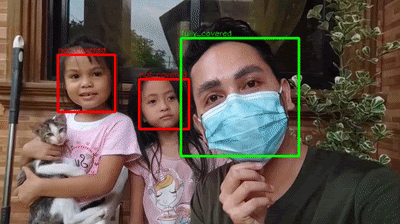
Sample output when running the python test.py videos/test4.avi