Image Generation Using Stable Diffusion, Google Colab, and CivitAI Resources
In recent years, the field of artificial intelligence has made remarkable strides, particularly in the realm of image generation, sometimes even photo realistic ones. One of the most polarizing advancements is the application of stable diffusion models, which have transformed the way we create and manipulate digital images. Stable diffusion is a powerful technique that harnesses the principles of probability and iterative refinement to produce stunning, high-quality visuals from seemingly random noise.
Introduction and Prerequisites
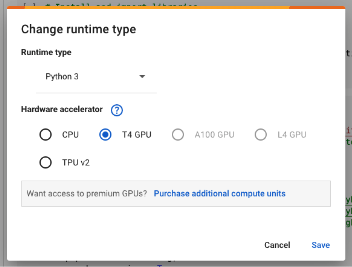
First step for this task is to create a new Google Colab notebook. To create a Google Colab notebook, go to https://colab.research.google.com/. Make sure you are logged in using a Google account before visiting that link. On the Colab page, click the “New Notebook” button. On the Notebook page, you can rename this Notebook to anything you want so that looking for this in the future will be easier. To rename, just click the “Untitled” text at the upper left of the page and change the name to whatever you want. Next is to change the runtime type of the notebook to use GPU instead of just the CPU. Stable diffusion is a heavy intensive process that is why we need a GPU to generate images. To change the runtime type, click the “Runtime”->”Change runtime type” select the radio button for “T4 GPU” and then click save. Now, the new notebook runs in CPU+GPU.
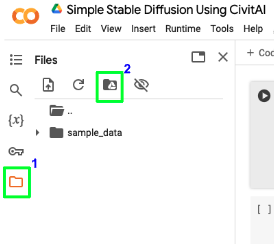
After changing the runtime, we also need this notebook to have access to our Google Drive. Click the folder icon on the left and then click the Google Drive icon on the top of the left side panel. After clicking the Google Drive icon, confirm to permit the notebook to have Google Drive access. After this, you should be able to see your Google Drive files and folders on the left panel.
Install and Import Stable Diffusion Libraries
Now that our notebook environment is ready, we can now start adding codes. To add codes, click the “+ Code” text button in the notebook. This will add our first section of our notebook wherein we can put our Python codes. Our first section of the code would be just for installing and importing libraries needed for Stable Diffusion.
# Install and import libraries
!pip install -U peft diffusers transformers accelerate
!pip install omegaconf
!pip install safetensors
from diffusers import StableDiffusionPipeline, DPMSolverMultistepScheduler
from diffusers.models import AutoencoderKL
import torch
After putting these install and import codes, click the circular play button at the left side of this code section. This will run the Python codes in this section. A check mark will appear on the left side of the circular play button if the run is successful.
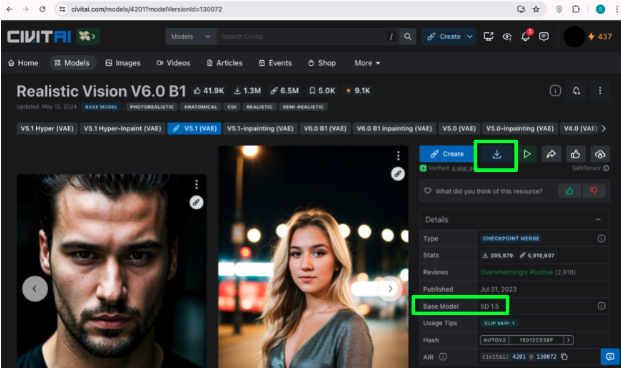
Before we move on to the second section of our code, we will first download some resources from CivitAI. For now, we will download a model checkpoint. A model checkpoint is just a base model that has been trained with some additional data. In this demo, we will use the checkpoint Realistic Vision with base model SD 1.5 (Not “SD 1.5 Hyper” etc, just “SD 1.5”) https://civitai.com/models/4201?modelVersionId=130072. There are other checkpoints you can try such as generating Pixar-like images using https://civitai.com/models/65203/disney-pixar-cartoon-type-a or Anime images using https://civitai.com/models/4982/anime-screencap-style-lora. You can also search your own at https://civitai.com/models and change the filter to only display “Checkpoint” for “Model types” and “SD 1.5” for “Base model”.
Load the Base Checkpoint Model
Because this is a base model, the file sizes for these are usually large, usually 2GB and up. When you download this checkpoint, the file extension would be “.safetensors”. After downloading, upload this safetensor file in your Google Drive. It would be more organized if you create a directory first in your Google Drive wherein you will upload the resources that we will use in this demo including this safetensor file. After uploading the large safetensor file, we can now add another section of code in our notebook. Click again the “+ Code” text button and paste the next section of codes to import the safetensor file and put it in the GPU. Make sure to note the location of your safetensor file in Google Drive and put it as the first parameter of StableDiffusionPipeline.from_single_file().
# Load the base model checkpoint
pipe = StableDiffusionPipeline.from_single_file(
    '/content/drive/MyDrive/test-sd/checkpoint/realisticVisionV60B1_v51VAE.safetensors',
    safety_checker=None, # Uncomment this line if you want to generate NSFW
    torch_dtype=torch.float16
)

pipe.scheduler = DPMSolverMultistepScheduler.from_config(
    pipe.scheduler.config,
    use_karras_sigmas=True
)

pipe.to('cuda')
Generate Image
Then click the play button on the left side of this code section to run this portion of the code. Just wait for the checkmark on the left of the play button to indicate the code has finished executing. Now that the libraries and model has been loaded, we can now start generating images. Click again the “+ Code” to add a third section of our notebook. This section will be responsible for generating and showing the image.
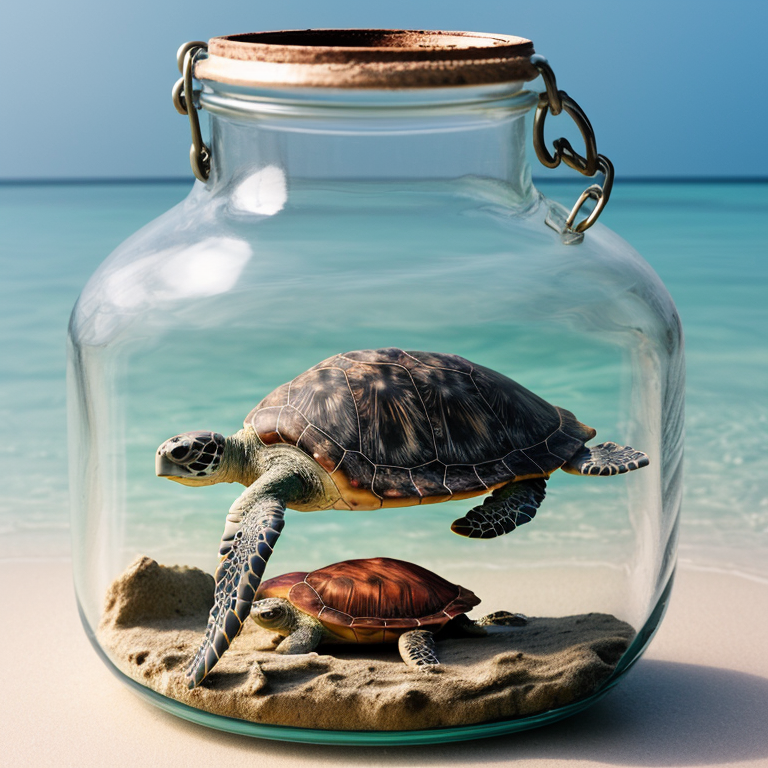
prompt = "a sea turtle inside a glass bottle"
generator = torch.manual_seed(9999)
image = pipe(
    prompt=prompt,
    width=768,
    height=768,
    num_inference_steps=25,
    generator=generator # Comment this out if you want to generate random images every time
).images[0]
image
Click the play button on the left side of this code section to start generating the image of a “a sea turtle inside a glass bottle”. Since we have a generator of 9999, this will help us generate the same exact image. Removing this including the parameter generator=generator will generate a random image every time we run this part of the code. Since we are just trying Stable Diffusion, it would be better to have a seed generator to reproduce the same results.
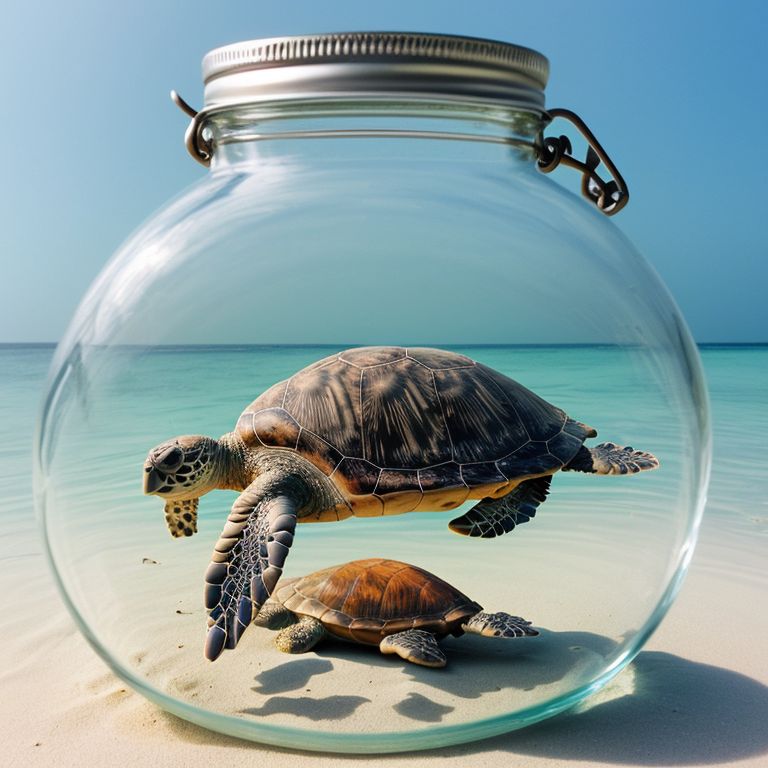 Prompt: a sea turtle inside a glass bottle
This is our image generated, since we are using a generator, we can add or tweak our prompt a little bit, for example “a sea turtle inside a clear glass bottle” wherein we added the word “clear”.
 Prompt: a sea turtle inside a clear glass bottle
As you can see, because we use the same generator number, our images are very close but the difference lies in the word “clear”. We can change the word “clear” to “magical” to get another similar image.
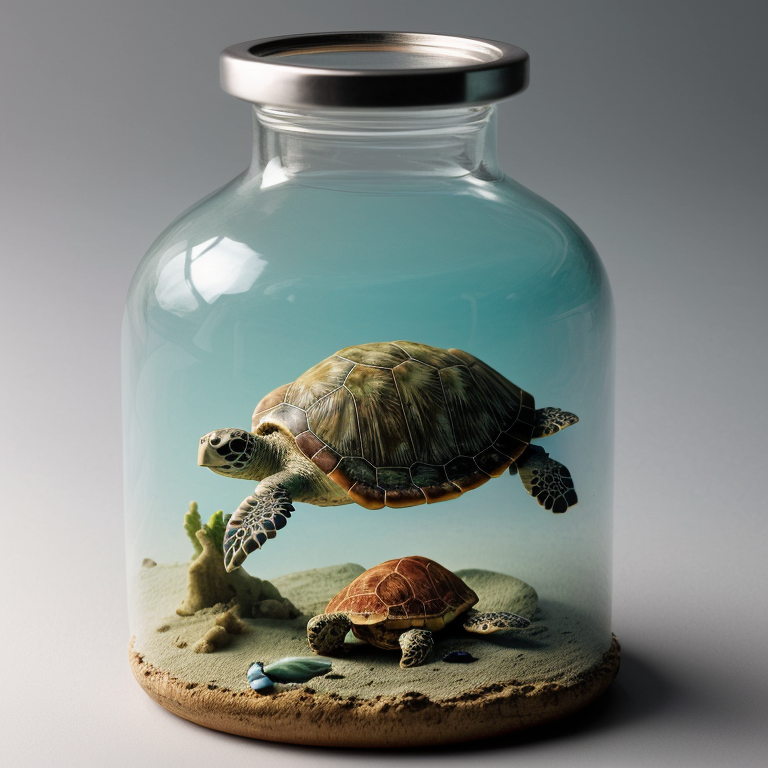 Prompt: a sea turtle inside a magical glass bottle
Image Generation Using One LoRA
Great, we can now create images based on what we want using a checkpoint we downloaded from CivitAI. But what if we want to generate images that the base model is not trained such as specific people and/or unique clothing. In this case, aside from the checkpoint, we will use LoRA (Low-Rank Adaptation). This technique is used in machine learning, particularly in the context of fine-tuning pre-trained models with a reduced computational cost and memory footprint. It is especially useful for adapting large language models or other types of neural networks to specific tasks without the need for extensive retraining. In this demo, we will just download LoRAs in CivitAI. For example, our goal image will be “portrait photo of a handsome japanese boy wearing a blue yellow vaultsuit suit standing in front of a cherry blossom tree”. The vault suit we refer to here is a suit from the vault dwellers in the game and TV series Fallout. The output image we will be getting is just a Japanese man wearing a regular suit with blue and yellow colors, not the vault suit from Fallout. This is because the checkpoint we are using (Realistic Vision) doesn’t know what a vault suit of Fallout looks like.
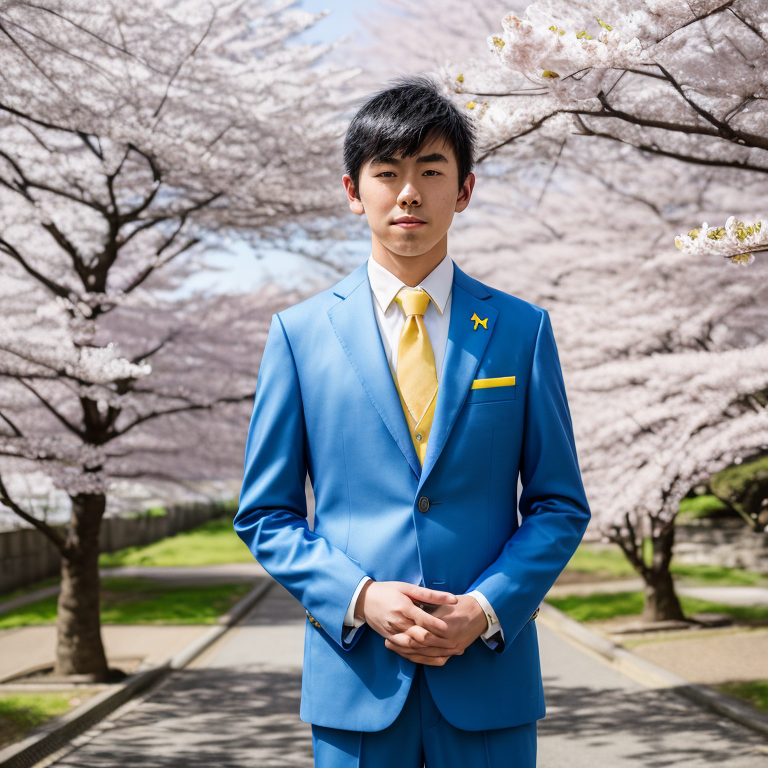 Prompt (No LoRA): portrait photo of a handsome japanese boy wearing a blue yellow vaultsuit suit standing in front of a cherry blossom tree
In order to achieve what we want, we need a LoRA of the vault suit from the Fallout game and TV series. Luckily, this LoRA already exists in the CivitAI website https://civitai.com/models/571082/men-vault-suit-fallout-series-and-game. This LoRA is compatible with our base model since it is “SD 1.5” so we can just download the safetensor and upload it in Google Drive. The reason why we are using the phrase “blue yellow vaultsuit suit ‘’ is because this is the trigger word for this LoRA. Most of the LoRAs have trigger words and when put in the prompt, Stable Diffusion tries it’s best to put it in the output image.

After downloading the safetensor of the LoRA and uploading it in Google Drive, we can now import it in our code. To do that, we need to load_lora_weights and set_adapters in our second section of our code. Here is our updated 2nd section of the code wherein we plug our vault suit LoRA.
# Load the base model checkpoint
pipe = StableDiffusionPipeline.from_single_file(
   '/content/drive/MyDrive/test-sd/checkpoint/realisticVisionV60B1_v51VAE.safetensors',
   safety_checker=None, # Uncomment this line if you want to generate NSFW
   torch_dtype=torch.float16
)

# Load LORA
pipe.load_lora_weights(".", weight_name=f'/content/drive/MyDrive/test-sd/lora/vaultsuit.safetensors', adapter_name='vaultsuit')
# Set adapter and weight for the LoRA
pipe.set_adapters(['vaultsuit'], adapter_weights=[1.0])

pipe.scheduler = DPMSolverMultistepScheduler.from_config(
   pipe.scheduler.config,
   use_karras_sigmas=True
)
pipe.to('cuda')
Run the second section of the code again by pressing the play button on the left. Then after running the second section of the code, run the third section of the code while using the same prompt “portrait photo of a handsome japanese boy wearing a blue yellow vaultsuit suit standing in front of a cherry blossom tree”.
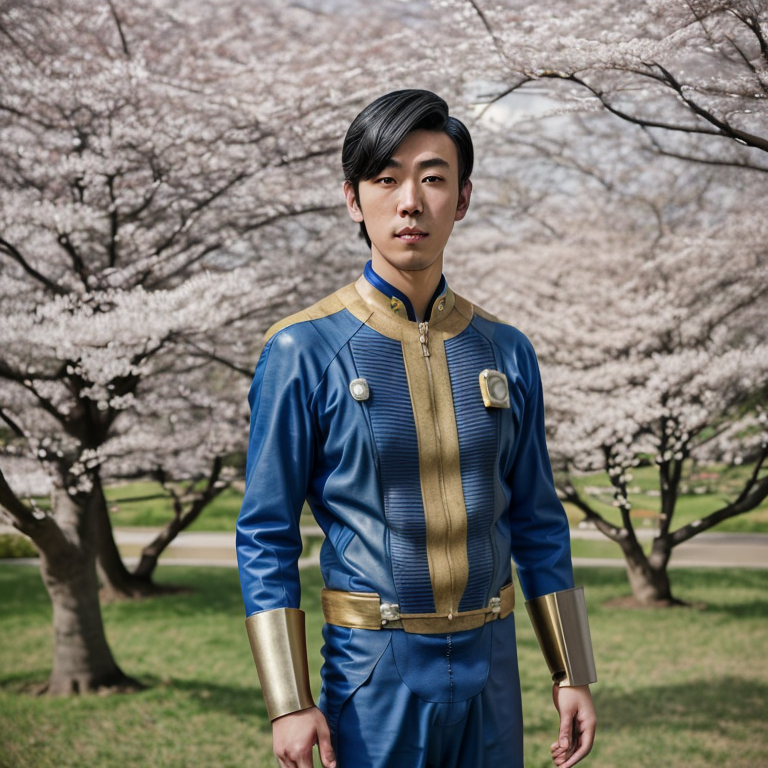 Prompt (With LoRA): portrait photo of a handsome japanese boy wearing a blue yellow vaultsuit suit standing in front of a cherry blossom tree
As you can see, with the vault suit LoRA, we can now get a blue and yellow jumpsuit from the Fallout game and TV series instead of a regular blue and yellow suit. If you want to add more LoRA like a place, more clothing, or the face of a celebrity, you can just search again in CivitAI and make sure you filter LoRA and SD 1.5. Here is an example code of loading more LoRAs.
Image Generation Using Multiple LoRAs
# Load the base model checkpoint
pipe = StableDiffusionPipeline.from_single_file(
   '/content/drive/MyDrive/test-sd/checkpoint/realisticVisionV60B1_v51VAE.safetensors',
   safety_checker=None, # Uncomment this line if you want to generate NSFW
   torch_dtype=torch.float16
)

# Load LORAs
pipe.load_lora_weights(".", weight_name=f'/content/drive/lora1.safetensors', adapter_name='lora1')
pipe.load_lora_weights(".", weight_name=f'/content/drive/lora2.safetensors', adapter_name='lora2')
pipe.load_lora_weights(".", weight_name=f'/content/drive/lora3.safetensors', adapter_name='lora3')
# Set adapter and weight for the LoRA
pipe.set_adapters(['lora1', 'lora2', 'lora3'], adapter_weights=[1.0, 1.0, 0.5])

pipe.scheduler = DPMSolverMultistepScheduler.from_config(
   pipe.scheduler.config,
   use_karras_sigmas=True
)
pipe.to('cuda')
As you can see in this sample code, we have loaded three hypothetical LoRAs. Lora 1 and 2 will have a weight of 1.0 which means whatever that LoRA is, it will generate it with high certainty. For example, if Lora 1 is a face of a celebrity, then the output image will have a person that almost closely resembles that celebrity. For the LoRA 3 in this example, it has just a weight of 0.5 meaning it will only have a lower resemblance to what the LoRA is on the output image. A caution though on loading multiple LoRAs is that the output image might become muddy. The cleanest image might be an image without a LoRA or only 1 LoRA. The more LoRAs you add, the more inaccurate or noisy the image becomes.