Implementing Microservice using WebSocket in NestJS
This article is about how to implement a NestJS Microservice using WebSockets. It will also demonstrate how to test the NestJS WebSockets using Postman.
What Is A Microservice?
Microservice is a software architecture pattern where a large, complex application is broken down into many small, independent processes. These individual services are built for maximum performance, scalability, and maintainability. These services are loosely coupled and independently deployable.
They’re also easier to develop in an Agile fashion because teams can work on individual services in isolation and then deploy them independently.
This architecture emerged as a solution to the old monolithic approach to web application development. In monolithic software, everything is built as one unit. All business logic is grouped into one extensive application.
Here are some solutions that you can choose from when it comes to microservices communication:
- REST over HTTP;
- REST over HTTP/2;
- WebSocket;
- TCP sockets;
- UDP packets;
Why NestJS?
NestJS is an open-source library for creating microservices with Node.js. It was created by the creators of the Express web application framework and further refined by their development team.
As you can imagine, NestJS is a perfect fit for building microservices, which are generally just a collection of small services that interact with each other to provide business functionality.
Creating a Microservice with NestJS
Nest is an unopinionated, general-purpose framework for building backends. It can be used to build a monolithic app, a microservice app or a hybrid app. Nest uses TypeScript (a typed superset of JavaScript that compiles to plain JavaScript).
In Nest, a microservice is fundamentally an application that uses a different transport layer than HTTP. Microservices use the TCP transport layer by default.
WebSockets
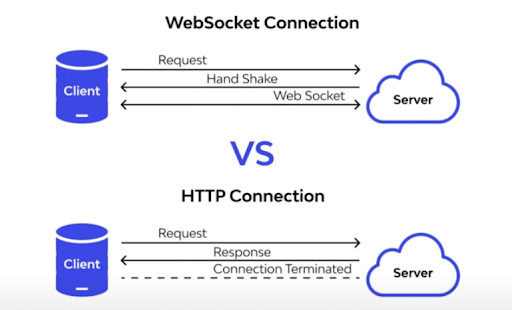
Websockets is a communication protocol which provides full-duplex communication channels over a single TCP connection established between a client and server. This allows the server to send to the browser without being called by the client.
It means that once an initial connection is established, the server can also push messages to the client. This is in contrast to the client-server model of HTTP, where a server cannot initiate a message transfer to a client but can only respond to an HTTP request initiated by a client.
Websockets are an alternative to HTTP communication in Web applications. They provide a persistent connection between a client and server that both parties can use to start sending data at any time.
NestJS WebSockets Gateways
NestJS WebSocket(WS) Gateway is simply a class annotated with @WebSocketGateway() decorator.
Technically, gateways are platform-agnostic which makes them compatible with any WebSockets library once an adapter is created. There are two WS platforms supported out-of-the-box: socket.io and ws. You can choose the one that best suits your needs.
Building a WebSocket Server using NestJS
Prerequisites
Setup
Step 1 - Create new nest project
To get started, let’s create a new NestJS application. sample-nestjs-websocket is our project name.
nest new sample-nestjs-websocketStep 2 - Install websocket core dependencies
npm i --save @nestjs/websockets @nestjs/platform-socket.ioStep 3 - Configure NestJS Gateway.
sampleis the name of our gateway.
nest g gateway sampleThe generated gateway class looks like this:
import { SubscribeMessage, WebSocketGateway } from '@nestjs/websockets';

@WebSocketGateway()
export class SampleGateway {
  ....
}
To allow the client to access the gateway from different domains, cors need to be enabled.
@WebSocketGateway({
    cors: {
        origin: '*',
    }
})
Step 4 - Receive and Broadcast Messages with Socket.IO
To listen to incoming messages, we use the @SubscribeMessage decorator.
To send an Event to all connected clients we will need to use the @WebSocketServer decorator and use the native WebSocket instance to emit a message.
Example code.
import {
  SubscribeMessage,
  WebSocketGateway,
  WebSocketServer,
  MessageBody
} from '@nestjs/websockets';
import { Server } from 'socket.io';

@WebSocketGateway()
export class SampleGateway {
  @WebSocketServer()
  server: Server;

  @SubscribeMessage('createMessage')
  create(@MessageBody() payload: any) {
    // just an example, it will log the payload to the console.
    console.log('payload: ', payload);

    // Broadcast message to all connected clients
    this.server.emit('onMessage', {
      message: payload
    })
  }
}
Note: In real applications, you will use dto for your payload. The code above is just a simple example for NestJS websockets.
Test WebSockets using Postman
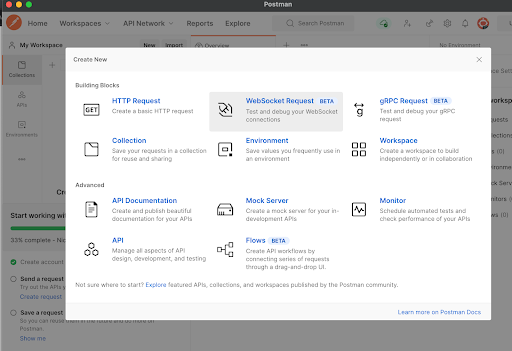
Step 1 - On Postman, click on
NewthenWebSocket Request
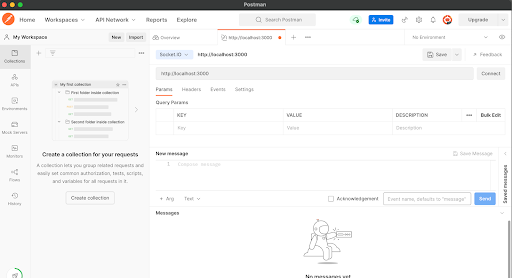
Step 2 - Select
Socket.IO, Enter server URL and then click on theConnectbutton.
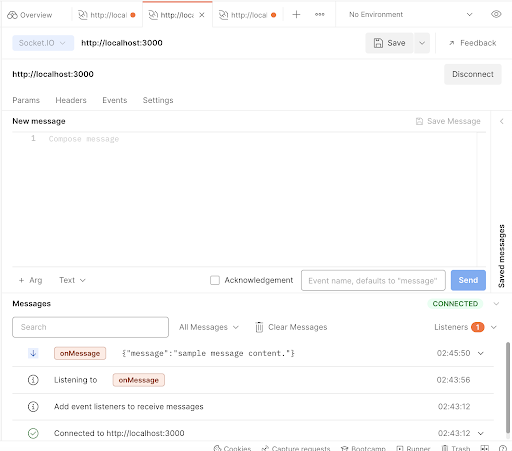
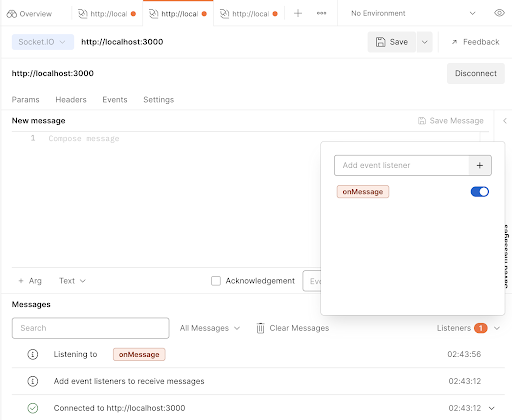
Step 3 - Send a message from the server back to the client.
- Create a new WebSocket Request (please follow step 1 and 2).
- Click on
Listenersand add the event listener (ex:onMessage).
- Send a message from the server.
SetEvent name(ex:createMessage) and create new message (ex:sample message content.). Then, click on theSendbutton.
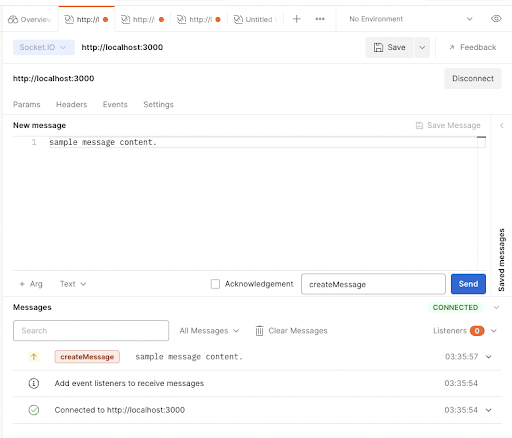
- Client received an event.