Setting Up a Graphical Desktop Environment in WSL2
Did you know that with Windows Subsystem for Linux (WSL), WSL2 specifically, you can use the entire Linux environment right on your Windows machine? I will walk you through the requirements and steps needed to set up a WSL2 graphical desktop environment.
When can this be of use to software developers or engineers? There are several use-cases I can think of, but let’s just bring up general ones:
- Doing away with Dual Boot. Boot on Windows 10/11 and still have full access to your Linux with Graphical Environment.
- No resource (time and money) to build your own homelab using Proxmox or Unraid.
- On Windows but needing to support a team mate’s issue on Ubuntu and no resource (storage & RAM) for dual boot or run Hypervisor, VirtualBox, VMWare, QEMU, etc. - USB Live mode is too slow.
Or simply, out of curiosity - can I run Graphical Applications in Windows 10/11 via WSL2?
You can. Let’s get started!
Requirements
Windows 10/11 with WSL2 Installed
wsl --install
Linux Distribution (e.g., Ubuntu)
Install a Linux distribution from the Microsoft Store, such as Ubuntu.
X Server for Windows
Install an X server to handle the graphical display from WSL. A popular choice is:
The X Server is a core component of the X Window System, managing graphical displays, handling inputs, and providing services to graphical applications. It is a client-server architecture that is extensible making it a powerful tool for creating and managing graphical environments on Unix-like operating systems. Run in Windows, it enables WSL2 Linux distributions to display desktop and applications with graphical interfaces on Windows.
Firewall Configuration
Configure the Windows firewall to allow connections to the X server and PulseAudio server if needed.
Necessary Packages in WSL
Install the required packages in your WSL environment. Open your WSL terminal and run:
sudo apt update
and cautiously perform an upgrade
sudo apt upgrade
Once your system is set with the packages you know you absolutely need and have frozen those you deem essential, install the necessary packages
sudo apt install xauth dbus-x11 gnome-shell
Setting Up the Environment
Install and Configure X Server
Install VcXsrv and configure it to start automatically when Windows starts. Make sure it listens on the default display port :0.
Install and Configure PulseAudio Server
Install a PulseAudio server on Windows. A recommended option is PulseAudio for Windows.
- Download it from the official website.
- Follow the installation instructions provided.
Understanding the Script
The full script is available to be copied over and executed in your environment. But before proceeding, it helps to understands what each of the calls is doing. This is necessary so that in case the script doesn’t work for you, you’ll know the code block to check or troubleshoot from.
Host & Services
Host IP for X Server & PulseAudio
export HOST_IP=$(cat /etc/resolv.conf | grep nameserver | awk '{print $2; exit;}')
The Host IP forms the base for X Server and PulseAudio server address. We’re simply saving a copy now for efficient reuse later.
Default Login Mode
Changes the default login mode to a non-graphical target.
sudo systemctl set-default multi-user.target
The above command sets the Ubuntu in WSL2 to the following mode:
Non-Graphical Environment
The system starts in text-based multi-user mode without launching a graphical user interface (GUI). Users interact with the system through command line interfaces (CLI) or terminal sessions on the host machine or remote environment.
Service Initialization
Services required for a networked multi-user environment will be started. This typically includes network services, login services, and other essential background services that enable multiple users to log in and use the system.
Resource Usage
A non-graphical environment consumes fewer system resources (CPU, memory), which can be beneficial for systems with limited resources or occasional use of graphical environment only.
Suitability
This mode is suitable for servers, development environments, and systems where GUI is not necessary. It’s also useful for troubleshooting and recovery purposes when issues with the graphical environment arise.
Environment Variables for Ubuntu Desktop
XDG & GNOME Desktop Environment
Let’s setup “X Desktop Group” environment variables needed. XDG’s open standards and specifications ensure interoperability between various desktop environments and applications in Linux and Unix-like operating system.
This particular script sets things up for Ubuntu and GNOME.
export XDG_CURRENT_DESKTOP=ubuntu:GNOME
export XDG_SESSION_DESKTOP=ubuntu
export DESKTOP_SESSION=ubuntu
export GNOME_SHELL_SESSION_MODE=ubuntu
export XDG_CONFIG_DIRS=/etc/xdg/xdg-ubuntu:/etc/xdg
export XDG_DATA_DIRS=/usr/share/ubuntu:/usr/local/share:/usr/share:/var/lib/snapd/desktop
export XDG_MENU_PREFIX=gnome-
export XDG_SESSION_TYPE=x11
export XDG_SESSION_CLASS=user
export GDK_BACKEND=x11
Graphics Library Configuration
Disables using Direct3D in the Mesa 3D graphics library.
export LIBGL_ALWAYS_SOFTWARE=1
There are still some issues with hardware accelerated rendering. For the time being, we’ll use software rendering until the issues are resolved or stable.
.Xauthority Generation
Password Placeholder
From hereon, {PASSWORD} should be interpreted as the literal password. You need to replace that string in the script with your own or modify several portions of the script using the placeholder.
There are several ways to do it but I leave that to you as an exercise. The modification you make for this part will also tell you your risk tolerance.
The Generator
A function to generate and set up the .Xauthority file, which is necessary for authenticating X sessions.
# Generate .Xauthority
generate_xauthority() {
    local magiccookie=$(echo '{PASSWORD}' | tr -d '\n\r' | md5sum | awk '{print $1}')
    xauth add "$DISPLAY" . "$magiccookie"
    local userprofile="$(wslpath $(cmd.exe /c "<nul set /p=%UserProfile%" 2>/dev/null))"
    if [ -f "$HOME/.Xauthority" ]; then
	    cp "$HOME/.Xauthority" "$userprofile"
	    echo "copied $HOME/.Xauthority to $userprofile"
	    echo $magiccookie
    else
        echo "Unable to find $HOME/.Xauthority"
    fi
}
generate_xauthority
When running a graphical desktop environment in WSL2, the .Xauthority file plays a crucial role in enabling secure communication between Linux GUI applications and an X server running on Windows. The setup script above generates and configures this file to ensure that the graphical applications can authenticate correctly with the X server.
The above script creates a new one and overwrites the previously copied .Xauthority to your Windows’ user profile directory. If you wish to run multiple GUI Linux on WSL2, you should modify the script to merge instead of overwrite.
Runtime Directory Permissions
Ensures that the runtime directory is properly set up and has the correct permissions.
# Extra check to synchronize runtime dir and ensure correct permissions export XDG_RUNTIME_DIR=/run/user/$(id -u)
set_xdg_dir_permissions() {
	echo $XDG_RUNTIME_DIR
	if [ ! -d "$XDG_RUNTIME_DIR" ]; then
	     sudo mkdir $XDG_RUNTIME_DIR
		 echo "Created user runtime directories"
    fi
    sudo chmod 700 $XDG_RUNTIME_DIR && sudo chown $(id -un):$(id -gn) $XDG_RUNTIME_DIR
}
set_xdg_dir_permissions
DBUS Session Setup
Configures the DBUS session bus, which is necessary for many desktop applications to communicate with each other.
set_session_dbus() {
	local bus_file_path="$XDG_RUNTIME_DIR/bus"
	sudo chown -Rf $(id -un):$(id -gn) $XDG_RUNTIME_DIR
	export DBUS_SESSION_BUS_ADDRESS=unix:path=$bus_file_path
	if [ ! -e "$bus_file_path" ]; then
		/usr/bin/dbus-daemon --session --address=$DBUS_SESSION_BUS_ADDRESS --nofork --nopidfile --syslog-only &
	fi
}
set_session_dbus
PulseAudio Configuration
Configures the PulseAudio server to enable sound.
echo "tcp:$HOST_IP"
export PULSE_SERVER="tcp:$HOST_IP"
Run the Custom Script
Copy the custom script provided below into a file, for example, setup_wsl_desktop.sh, and save it in your Ubuntu home directory.
# Host IP
export HOST_IP=$(cat /etc/resolv.conf | grep nameserver | awk '{print $2; exit;}')

# Initialize needed variables
export DISPLAY=$(cat /etc/resolv.conf | grep nameserver | awk '{print $2; exit;}'):0.0
export LIBGL_ALWAYS_INDIRECT=0

# Change default login mode
sudo systemctl set-default multi-user.target

# Setting up essential environment variables for Ubuntu desktop
# Ubuntu default desktop (GNOME Shell variant)
# https://wiki.gnome.org/Projects/GnomeShell
export XDG_CURRENT_DESKTOP=ubuntu:GNOME
export XDG_SESSION_DESKTOP=ubuntu
export DESKTOP_SESSION=ubuntu
export GNOME_SHELL_SESSION_MODE=ubuntu

# Commonly referenced environment variables for X11 sessions
# https://specifications.freedesktop.org/basedir-spec/latest/
export XDG_CONFIG_DIRS=/etc/xdg/xdg-ubuntu:/etc/xdg
export XDG_DATA_DIRS=/usr/share/ubuntu:/usr/local/share:/usr/share:/var/lib/snapd/desktop
export XDG_MENU_PREFIX=gnome-
export XDG_SESSION_TYPE=x11
export XDG_SESSION_CLASS=user
export GDK_BACKEND=x11

# Disable using Direct3D in Mesa 3D graphics library
export LIBGL_ALWAYS_SOFTWARE=1

# Generate .Xauthority
generate_xauthority() {
    local magiccookie=$(echo '{PASSWORD}' | tr -d '\n\r' | md5sum | awk '{print $1}')
    xauth add "$DISPLAY" . "$magiccookie"
    local userprofile="$(wslpath $(cmd.exe /c "<nul set /p=%UserProfile%" 2>/dev/null))"
    if [ -f "$HOME/.Xauthority" ]; then
	    cp "$HOME/.Xauthority" "$userprofile"
	    echo "copied $HOME/.Xauthority to $userprofile"
	    echo $magiccookie
    else
        echo "Unable to find $HOME/.Xauthority"
    fi
}
generate_xauthority

# Extra check to synchronize runtime dir and ensure correct permissions export XDG_RUNTIME_DIR=/run/user/$(id -u)
set_xdg_dir_permissions() {
	echo $XDG_RUNTIME_DIR
	if [ ! -d "$XDG_RUNTIME_DIR" ]; then
	     sudo mkdir $XDG_RUNTIME_DIR
		 echo "Created user runtime directories"
    fi
    sudo chmod 700 $XDG_RUNTIME_DIR && sudo chown $(id -un):$(id -gn) $XDG_RUNTIME_DIR
}
set_xdg_dir_permissions

set_session_dbus() {
	local bus_file_path="$XDG_RUNTIME_DIR/bus"
	sudo chown -Rf $(id -un):$(id -gn) $XDG_RUNTIME_DIR
	export DBUS_SESSION_BUS_ADDRESS=unix:path=$bus_file_path
	if [ ! -e "$bus_file_path" ]; then
		/usr/bin/dbus-daemon --session --address=$DBUS_SESSION_BUS_ADDRESS --nofork --nopidfile --syslog-only &
	fi
}
set_session_dbus

# pulseaudio
echo "tcp:$HOST_IP"
export PULSE_SERVER="tcp:$HOST_IP"`
Running X Server on Windows & GNOME Session
Execute the Script
In your Ubuntu WSL, make the script executable and run it.
chmod +x setup_wsl_desktop.sh
./setup_wsl_desktop.sh
If there are no errors, the environment is ready.
You may also add the script to your .bashrc to setup the environment everytime you login to your Terminal.
echo "./setup_wsl_desktop.sh" >> ~/.bashrc
Run GNOME Session
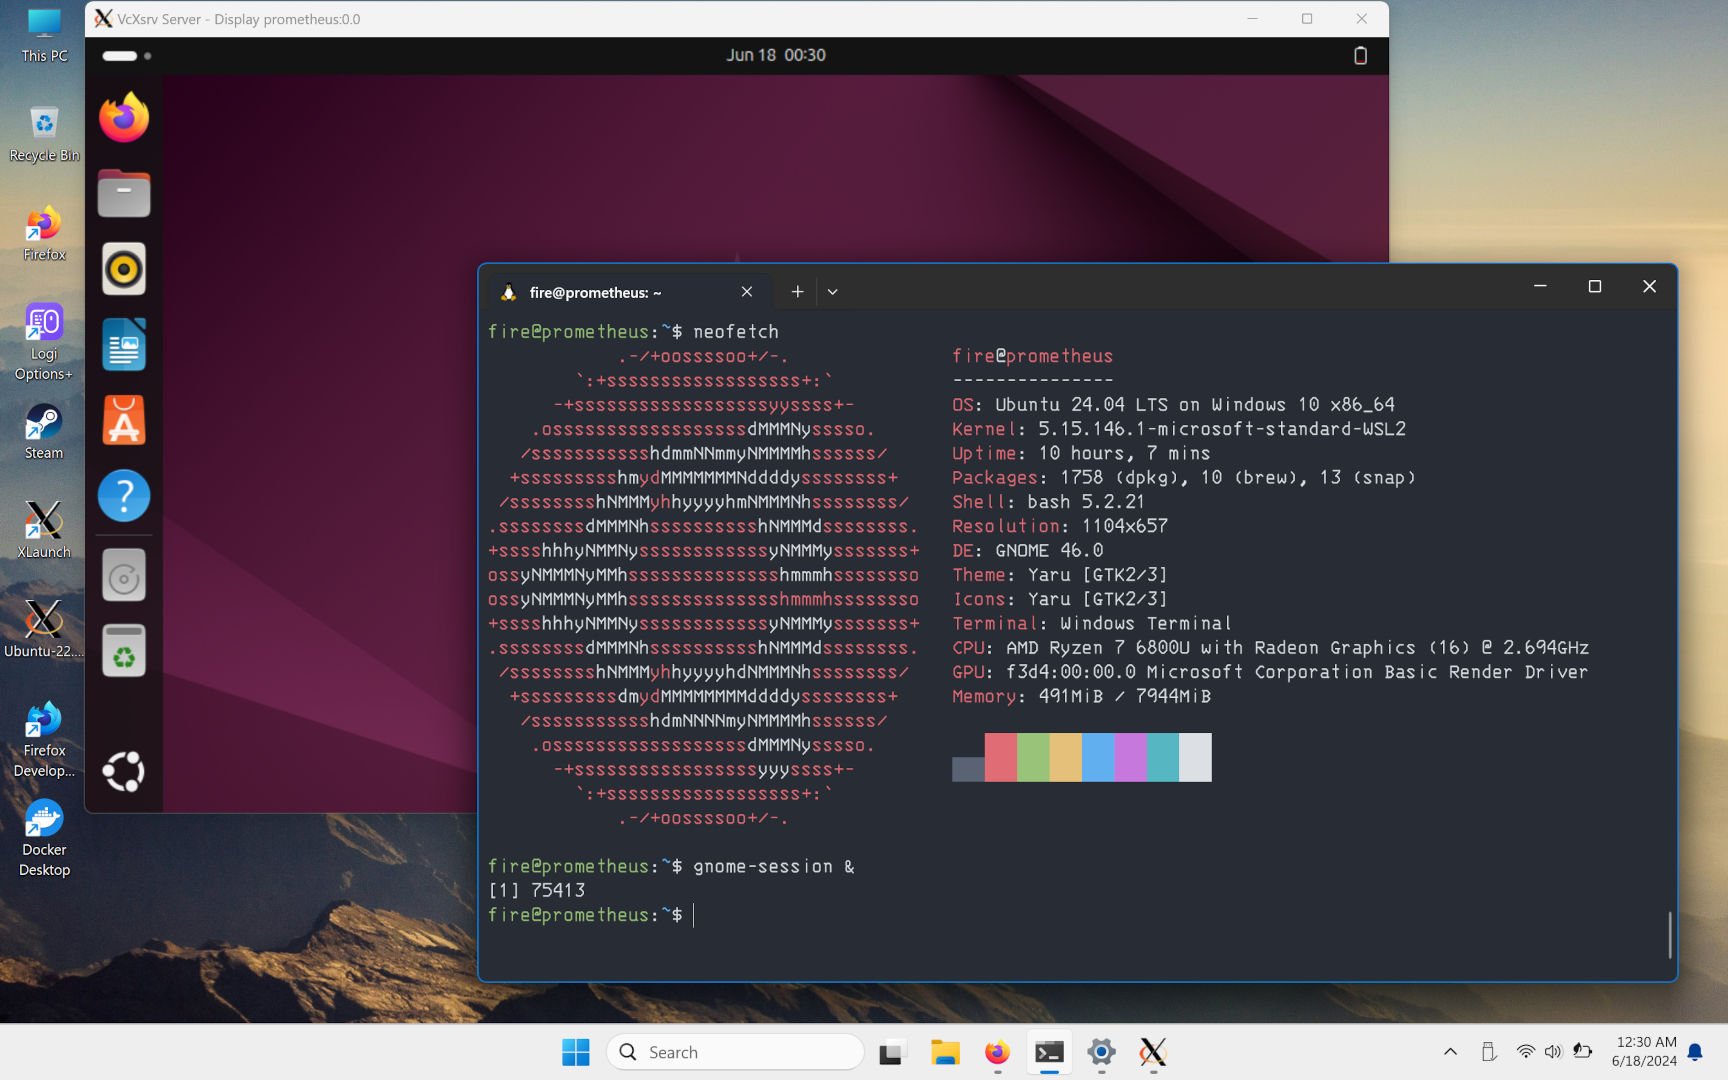
You can now start gnome-session to start sending data to the X Server in Windows.
gnome-session
or
gnome-session &
if you want to reuse the terminal and run gnome-session in the background.
In either case, you need to make sure the terminal that started gnome-session is not closed or terminated.
Windows X Server
If you configured X Server in Windows 10/11 as written here then all you have to do is bring to foreground the X Window :0 or whichever display you set it, as the profile may already be running in the background. If not; configure, save a profile, and run the profile.
PulseAudio Server
Understand that if you do not have this running as a service in Windows 10/11, you will not have audio in your Ubuntu Graphical Environment through Windows X Server.
If you do not have this as a service, run this before you start gnome-session.
Are you curious?
Will this run in Ubuntu through Docker, in Apple Silicon with XQuartz?
I hope that with the above breakdown of the provided script, I’ve accelerated your set up of a functioning graphical desktop environment in WSL2, which you can interact smoothly through the Windows host.